This guide will walk you through the process of pairing Sage Vantage with your Moodle course. Once paired, you can create deep links to Vantage content and set up grade sync for any Vantage assignments you wish to include in your Moodle gradebook.
Table of Contents
· Video Tutorials
· Create a Vantage Course
o Create a New Course
o Copy an Existing Course
· Deep Links and Grade Sync in a New Moodle Course
o Excluding Grades for Completion from the Moodle Gradebook Calculations
· Deep Links and Grade Sync in a Moodle Course Copy
Video Tutorials
Tutorial videos for Vantage and for using Vantage with your Moodle course are available on the Vantage Technical Support website:
· Sage Vantage Instructor Videos
Create a Vantage course
Before you can add deep links or grade sync items to your Moodle course, you must create your Sage Vantage course. If you have additional sections in the same term or will teach the course again in a new term, you can copy an existing Vantage course to use with the additional sections.
Visit https://vantage.sagepub.com to Login or Sign Up for Vantage. If you are not sure what your password is, you can click the "Forgot Password?" link to reset it.
Do you want to…
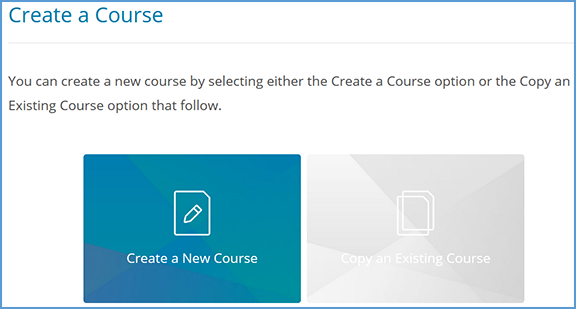
· Create a New Course
· Copy an Existing Course
Create a New Course
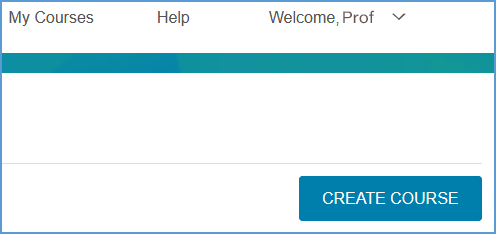
If you have never created a Vantage course, when you first login you will be taken directly into the course creation process. If you have created a course before, you can use the Create Course button at the top right of your My Courses Dashboard to create a new course.
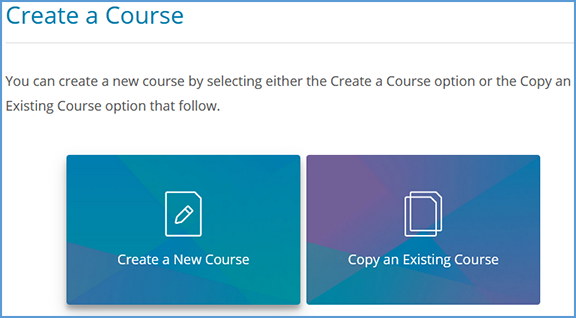
1. Click Create a New Course to begin.
2. Complete the Course Information page (1. Enter Course Information). Mandatory fields are marked with an asterisk.
a. Select an Institution and Department. If you do not see your institution or department in the dropdowns, follow the directions on the right of the page to update your information.

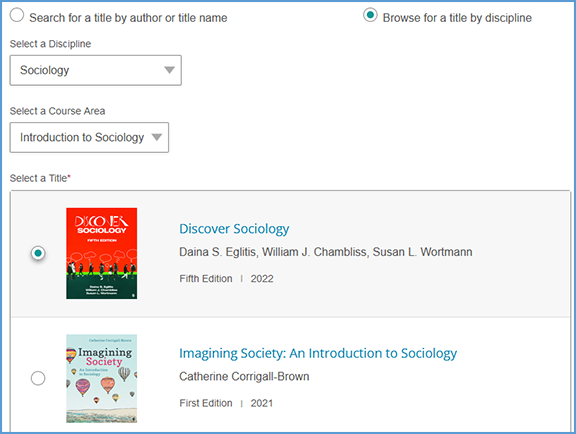
b. Locate the title you wish to use. There are two ways to find it.
You can start typing to search by author or title.
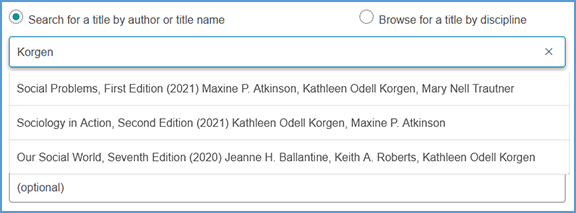
You can also search by discipline. Once you choose the discipline, you can further refine your search by choosing a Course Area. All titles available for the discipline and course area combination you select will display. Choose your title from the list.
c. Complete the Course name, Section Name, Course Start and End dates, Time Zone, and Course Description fields. Section Name and Course Description are optional fields, but all other information is required.
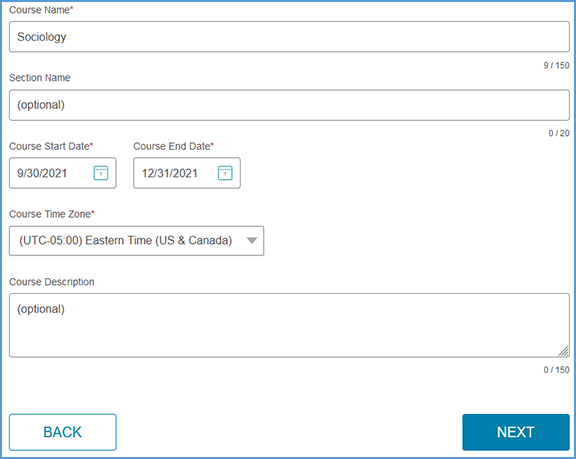
d. Click Next once you complete your course details.
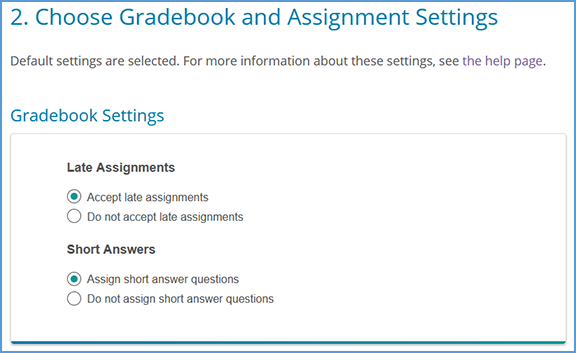
3. On the next page (2. Choose Gradebook and Assignment Settings), default settings for your gradebook and assignments are selected. The images below show the default settings, but you can make changes based on the needs of your course.
a. Gradebook Settings
Default: Accept late assignments, Assign short answer questions and Critical Thinking Checks
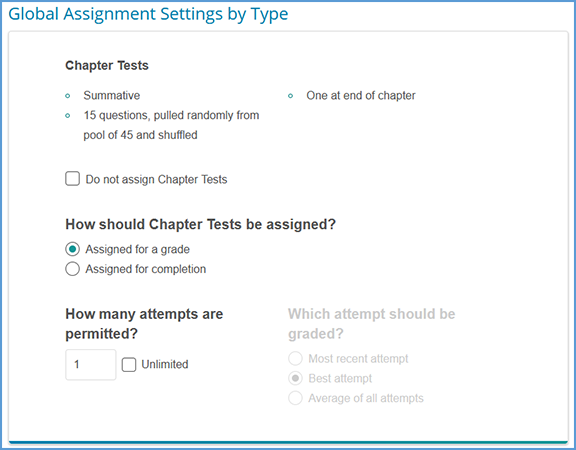
b. Global Assignment Settings by Type
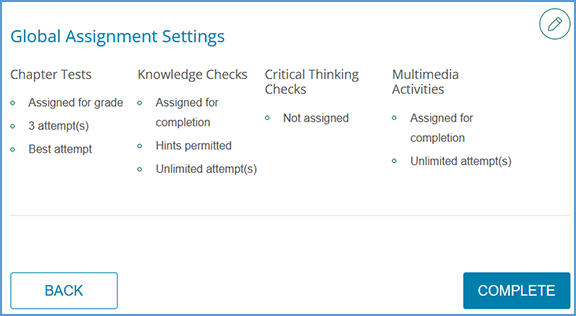
i. Chapter Tests
Default: Assigned for a grade, one attempt, Unlimited Chapter Test reviews
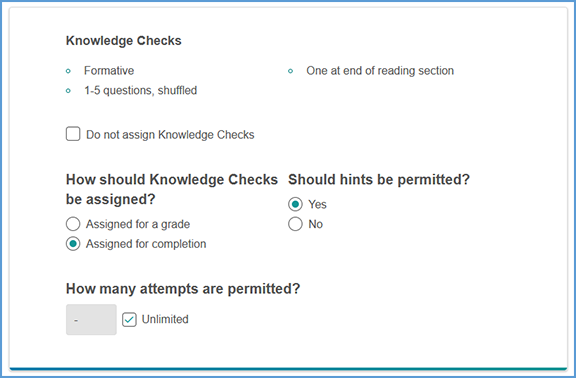
ii. Knowledge Checks
Default: Assigned for completion, Hints are allowed, Unlimited attempts
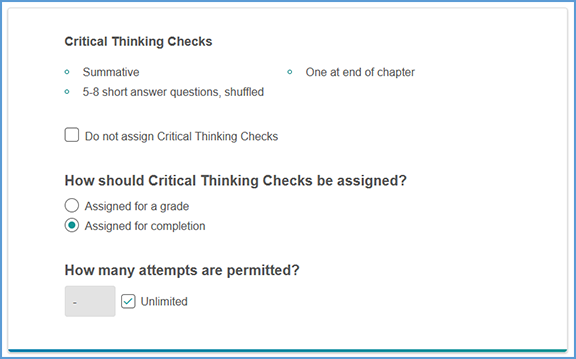
iii. Critical Thinking Checks
(If you elected not to assign short answer and Critical Thinking Checks earlier on this page, you will not see this section)
Default: Assigned for completion, Unlimited attempts
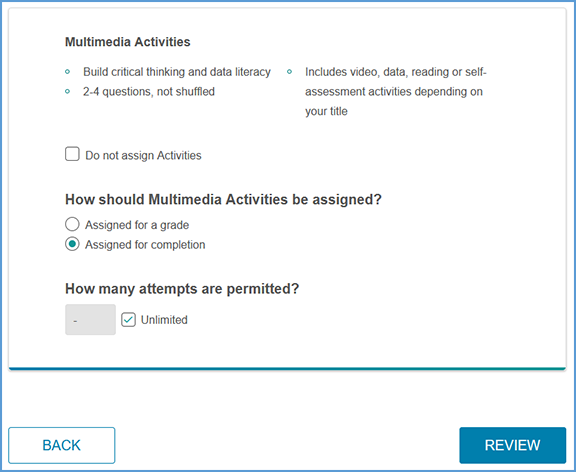
iv. Multimedia Activities
Default: Assigned for completion, Unlimited attempts
c. Click Review to verify your course settings.
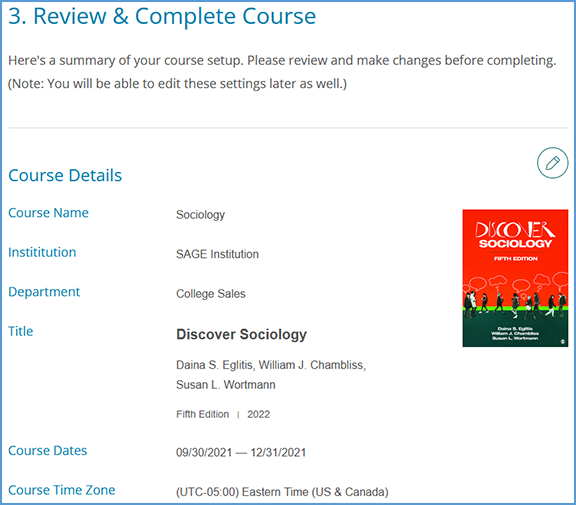
4. On the Review page (3. Review & Complete Course), you can double check the settings you made for your course.
a. Review the Course Details. If you need to make changes, click the pencil icon to the right of this section.
b. Review the Gradebook Settings. If you need to make changes, click the pencil icon to the right of this section.

c. Review the Global Assignment Settings. If you need to make changes, click the pencil icon to the right of this section.
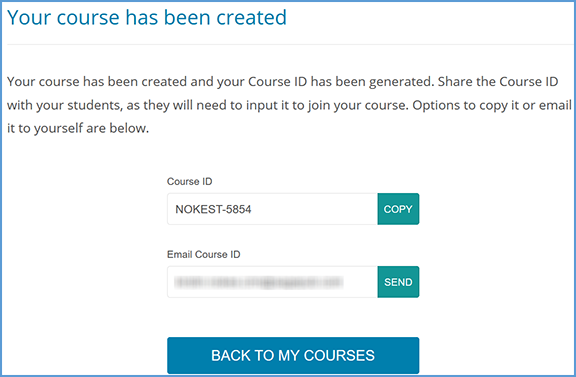
d. Click Complete to finish creating your course. On the course creation confirmation page, you can click the respective Copy buttons to copy your course link (used for non-LMS integrated courses only) or Course ID. You can then paste these details to wherever you want to store the information.
You can also click the Send button to email a copy of this information to yourself. Once you are finished on this page, click Back to My Courses to return to your My Courses Dashboard.
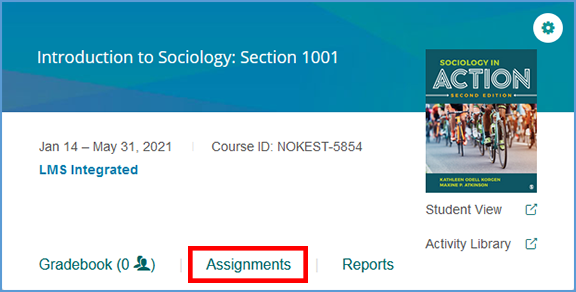
5. Once your course is created, you can go to the Assignments tab from the course tile on your My Courses Dashboard page. This will allow you to apply more granular settings for each Chapter and/or assignment.
6. Once you have finished editing Chapters and Assignments, your Vantage course can be paired with your Moodle course.
Copy an Existing Course
If you have created a Vantage course in the past, you may wish to copy that course to use for another section in the same term or for a new term.
 TIP: Copying a course is a one-time action. You should finish customizing the assignments and due dates of your course before making a copy of it. After you finish the copy process, changes will need to be made to both courses separately.
1. Click Create Course at the top right of your My Courses Dashboard.
2. Click Copy an Existing Course.
3. You will see a list of all of your courses available to copy.
a. Choose the course you wish to copy.
b. If the course dates of your old and new courses match – for example, if you are running multiple sections of the same course in a single term – you can copy the due dates as well. Tick the "Copy due dates" checkbox to retain them.
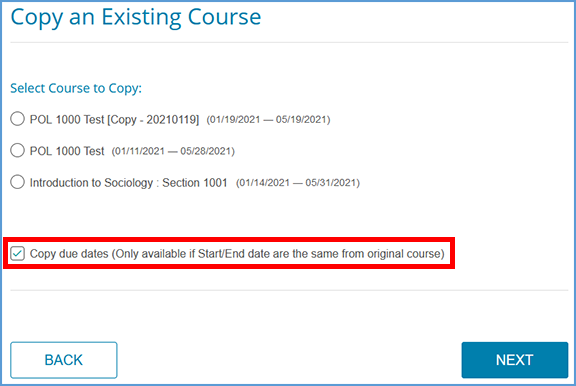
c. Click Next to start the course creation process.
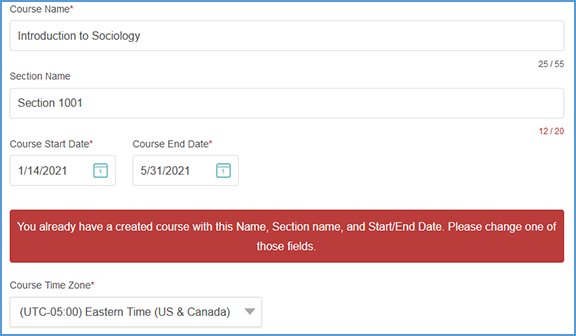
4. The Course Details of your chosen course will appear. You will see a banner message to change the Course Name, Section Name or Start and End Dates. Once you change one or more of these fields, click Next.
5. On the Review page (3. Review & Complete Course), you can double check the settings you made for your course.
a. Review the Course Details. If you need to make changes, click the pencil icon to the right of this section.
b. Review the Gradebook Settings. If you need to make changes, click the pencil icon to the right of this section.
c. Review the Global Assignment Settings. If you need to make changes, click the pencil icon to the right of this section.
d. Click Complete to finish creating your course. On the course creation confirmation page, you can click the respective Copy buttons to copy your course link (used for non-LMS integrated courses only) or Course ID. You can then paste these details to wherever you want to store the information.
You can also click the Send button to email a copy of this information to yourself. Once you are finished on this page, click Back to My Courses to return to your My Courses Dashboard.
6. Once your course is created, you can go to the Assignments tab from the course tile on your My Courses Dashboard page. This will allow you to apply more granular settings for each Chapter and/or assignment.
7. Once you have finished editing Chapters and Assignments (if necessary), your Vantage course can be paired with your Moodle course.
Deep Links and Grade Sync in a New Moodle Course
For best results, create your Vantage course before you are ready to pair it with your Moodle course.
TIP: When adding deep links, we recommend using Firefox. When using Chrome, Moodle has a bug that will log you out when trying to add deep links. Once you have added deep links to your course, you (and your students) can access those links in Moodle with Chrome or Firefox.
You can add a module specifically for your Sage Vantage content or you can include the Vantage links within existing modules (for example, if you set up your Moodle course with a module for each chapter). The layout of your Moodle course depends entirely on your instructional design preferences.
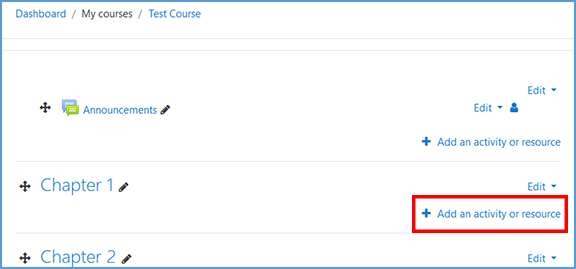
1. In your Moodle course, go to the module you wish to add content to. Select the link to Add an activity or resource.
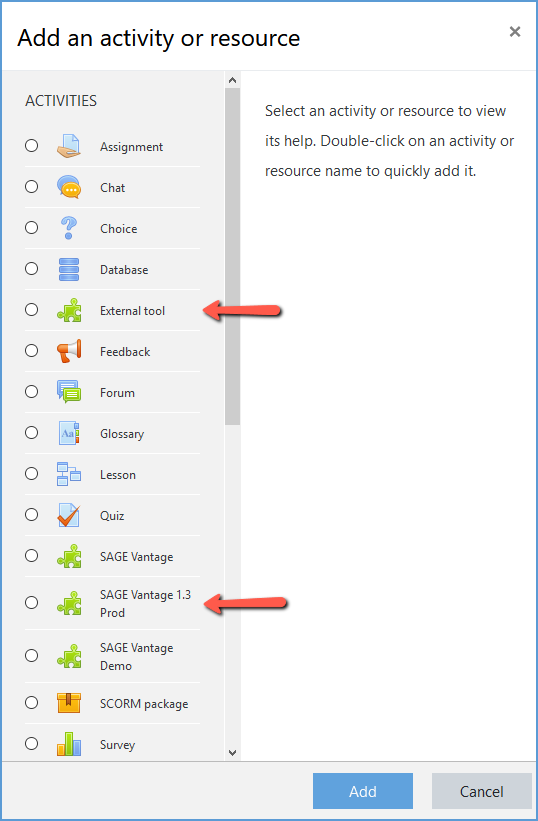
2. In the list of activities, click Sage Vantage.
TIP: If you do not see Sage Vantage in the list of activities, click External Tool instead. You can then expand the dropdown for "Preconfigured Tools" to pick Sage Vantage from the list.
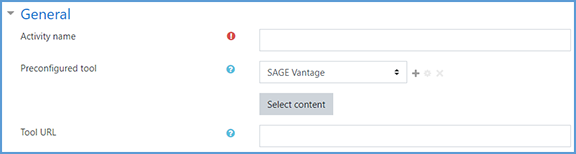
3. Click on the Select Content button.
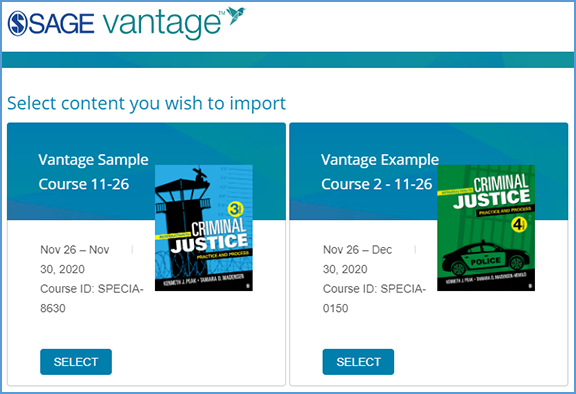
4. Locate the Vantage course you wish to pair with, then click Select. If you only have one Vantage course in your account, it will automatically be selected for you.
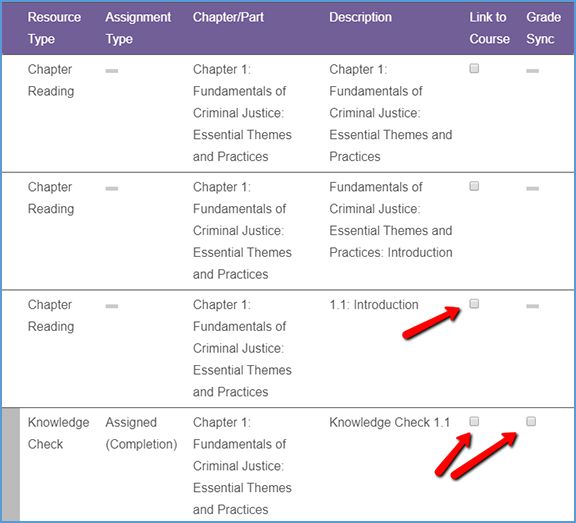
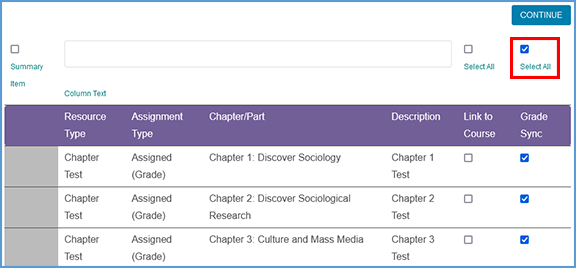
5. Once you filter the content, the sorted list will show only those items matching your selection. You can choose items from the resulting list to create deep links and/or grade syncs in your Moodle course.
For each item in the list, there are two columns on the right of the page. The left column (Link to Course) refers to the deep link that is added to your Moodle module. The right column (Grade Sync) determines if an assignment is synced with your Moodle gradebook.
If an item is not gradable – such as a chapter reading – the grade sync column will not have a checkbox. It will instead have a dash indicating it cannot be synced. If you have previously grade synced an assignment, the Grade Sync column will show a dash as well indicating it's already synced.
a. Create deep links (with or without grade sync):
To create a link in your Moodle course, tick the checkbox in the "Link to Course" column for that item. If you select a gradable item (such as a Knowledge Check, Video Activity or Chapter Test), the Grade Sync column is automatically ticked as well. This allows you to create a link and a grade sync item at the same time.
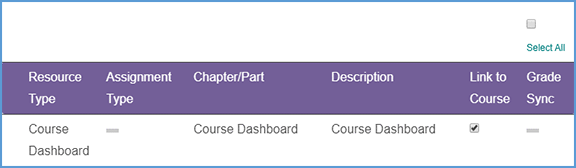
Note: Moodle is limited to creating only a single link at a time. For example, if you want to link to each chapter reading in a text with 15 chapters, you will need to create each link separately. Alternatively, you could create a single link to the Course Dashboard or Chapter 1 reading, then students could navigate to anywhere in the text from there.
After you've selected the link to add to your Moodle course, click Continue to review your selection. This button is available at the top and bottom of the page.
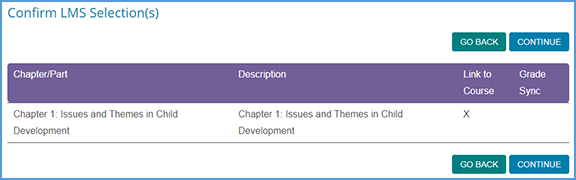
You can double check your selection on the "Confirm LMS Selection(s)" page.
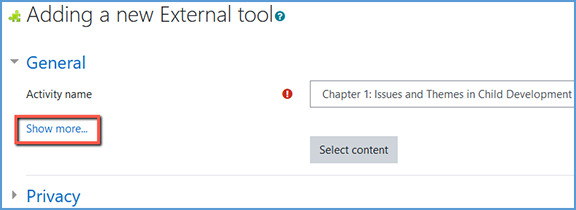
Click Continue on the "Confirm LMS Selection(s)" page to return to Moodle. Within Moodle, click Show More.
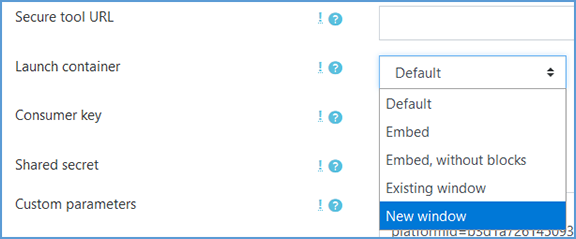
Click on the dropdown for Launch container and change set it to New window.
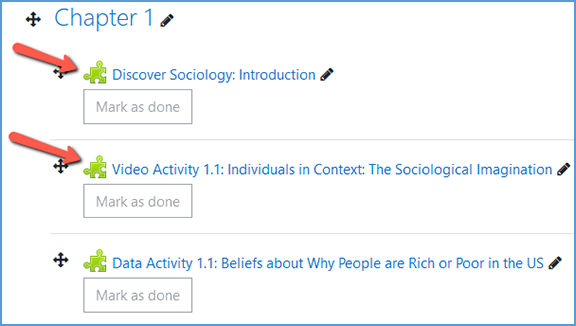
Click Save and return to course at the bottom of the page. The deep link will appear in your module. If you linked an item with grade sync, a gradebook column is created at the same time.
Repeat this process to add all links you want to include in your Moodle course.
b. Create grade syncs only (without deep links):
You can add grade sync assignments without adding deep links for them. For example, you may want to link only a single chapter reading in your Moodle module, but still have all assignments from that same chapter grade synced with your Moodle gradebook.
TIP: Unlike deep links which need to be added one at a time, Moodle supports adding multiple grade sync items in one go.
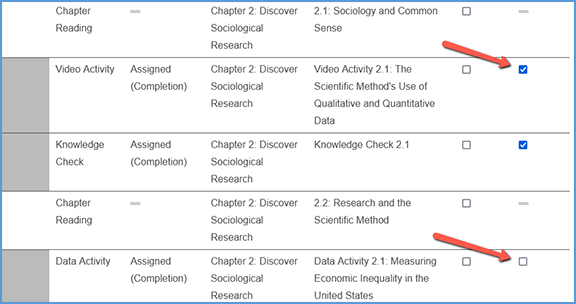
If you want to grade sync only specific assignments, you can tick the Grade Sync checkbox next to those assignments. Only the items you choose to grade sync will create a gradebook column in Moodle. In this example, a Knowledge Check and Video Activity are selected for grade sync, but the Data Activity is not.
If you want to grade sync everything in the filtered list – for instance, if you filter by Chapter Tests and want to grade sync all of them – you can tick the "Select All" checkbox above the Grade Sync column. All items will be selected for grade sync.
When you choose to Grade Sync an assignment, a gradebook column is created in your Moodle gradebook for the assignment. After you've selected one or more items to grade sync, click Continue to review your selections. This button is available at the top and bottom of the page.
You can double check your selections on the "Confirm LMS Selection(s)" page.
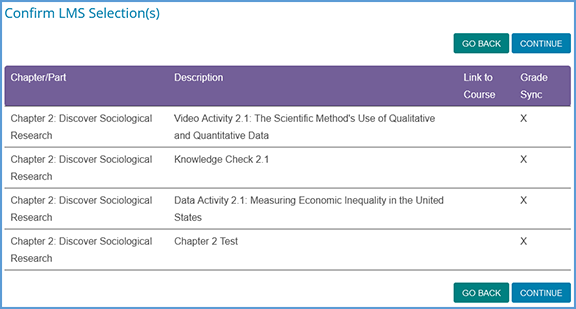
If you want to add more grade sync items, you can use the Go Back button to add more grade syncs. Once you have picked everything you want grade synced, click Continue on the "Confirm LMS Selection(s)" page to complete the grade sync.
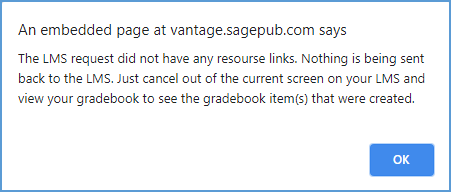
After a few seconds, you will see a pop-up message indicating that no links were created. Click OK to return to Moodle. You can visit your Moodle gradebook to see the new columns that were added for your assignment selections.
6. When you are finished adding deep links and grade sync items to your Moodle course, click on a Vantage link to complete the grade sync connection. If you do not click on a Vantage link, Vantage will not send grades to your Moodle gradebook.
Note: If you add new grade sync items at a later date, you must click on a Vantage link again to complete the grade sync connection for the new items.
Excluding Grades for Completion from the Moodle Gradebook Calculations
Knowledge Checks, Video Activities, etc. are often assigned for completion instead of a grade in Vantage. If you choose to grade sync these assignments, the gradebook column in Moodle will record the point value to show the assignment was completed.
While you may want your Moodle gradebook to show these assignments were completed, you may not want to include these points in the final grade calculations. You can exclude these assignments from the final grade, but still allow them to display in the gradebook to show the assignment was completed.
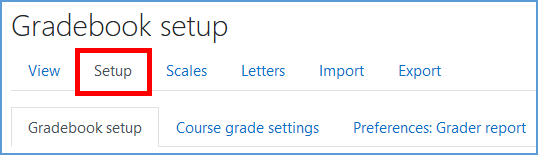
1. Go to your Moodle gradebook.
2. Go to the Setup tab.
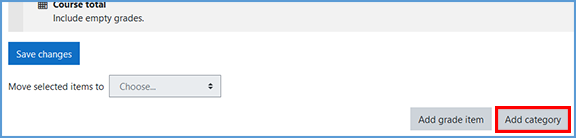
3. At the bottom of the page, click Add Category.
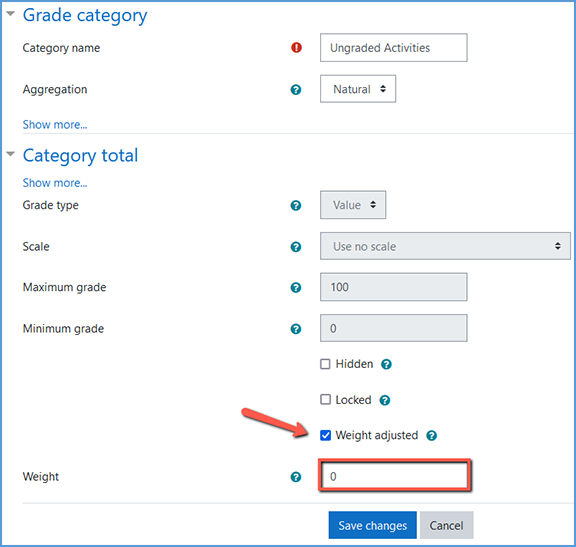
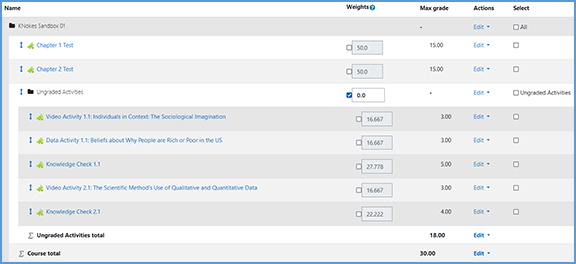
4. Name this category. The name can be what makes sense for your course. In this example, we are using Ungraded Activities.
In the "Category total" section, tick the checkbox for Weight adjusted. Set the weight to 0. Click Save changes at the bottom of the page.
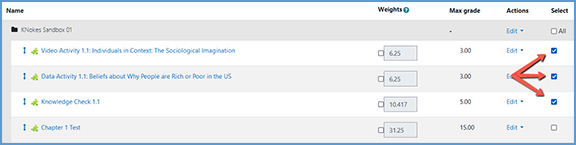
5. On the Gradebook Setup page, tick the checkboxes in the Select column for all Vantage assignments that you want to exclude from the final grade calculations.
6. At the bottom left of the Gradebook Setup page, click the dropdown for Move selected items to. Choose the category you created for these assignments.

7. Since the excluded assignments are placed in a category with a weighting of zero, the point values are not included in the final grade calculations.
In this example, the Video Activities, Data Activities and Knowledge Checks were placed in the Ungraded Activities category. Chapter Tests 1 and 2 are the only graded items for 15 points each. The possible Course Total correctly reflects 30 points.
Deep Links and Grade Sync in a Moodle Course Copy
For best results, create or copy your Vantage course before you are ready to pair it with your Moodle course copy.
1. Follow your school's normal process to make a copy of your Moodle course including the Vantage links.
2. Once your Moodle course copy is complete, go to a module and click on any Vantage link to begin the pairing process.
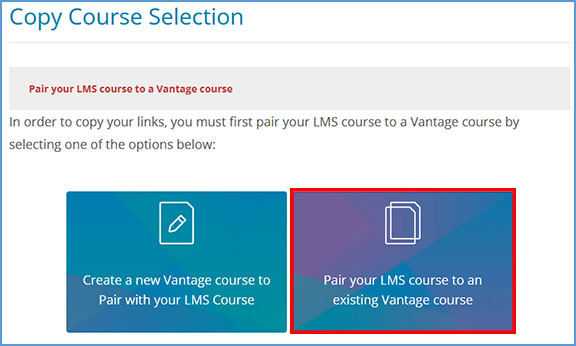
3. On the Vantage "Copy Course Selection" page, choose the option to Pair your LMS course to an existing Vantage course.
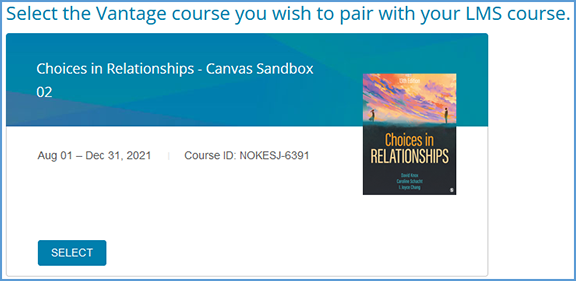
4. Locate the Vantage course you wish to pair with, then click Select.
5. After you select the course, you will see the student preview of the content for the link you clicked to initiate the pairing process.
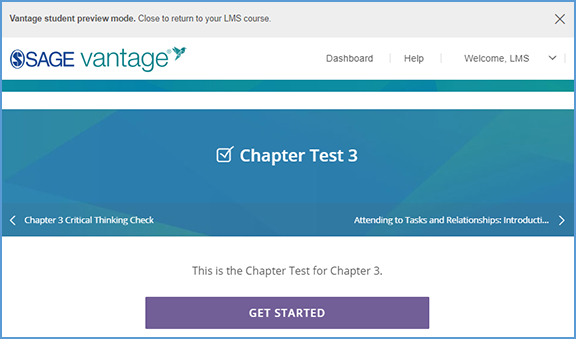
6. You can close the student preview and return to your Moodle course. No further action is required.